API > What AI-Features do you offer?
Video
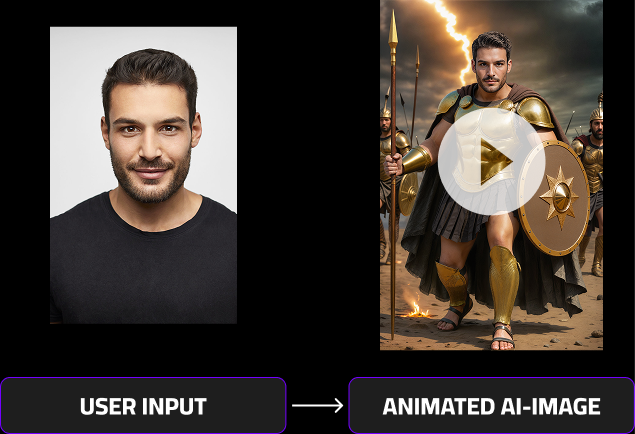
Our video product transforms any static AI-image into a short 8 seconds long, dynamic video using AI-generated motion and animation. By sending an image to our API along with a creative prompt, you can bring personalized artworks to life — adding movement, atmosphere, and emotion to every creation.
Pros & Cons
- Adds interactivity and excitement to your activations
- Creates immersive, shareable experiences for users
- ❌Rendering time is longer — typically 2–3 minutes per video
- ❌Requires thoughtful integration to manage user wait times effectively
How does Video work?
The Video feature is designed to animate personalized AI-generated images, turning them into short, dynamic video clips.
To use it effectively, follow the process below:
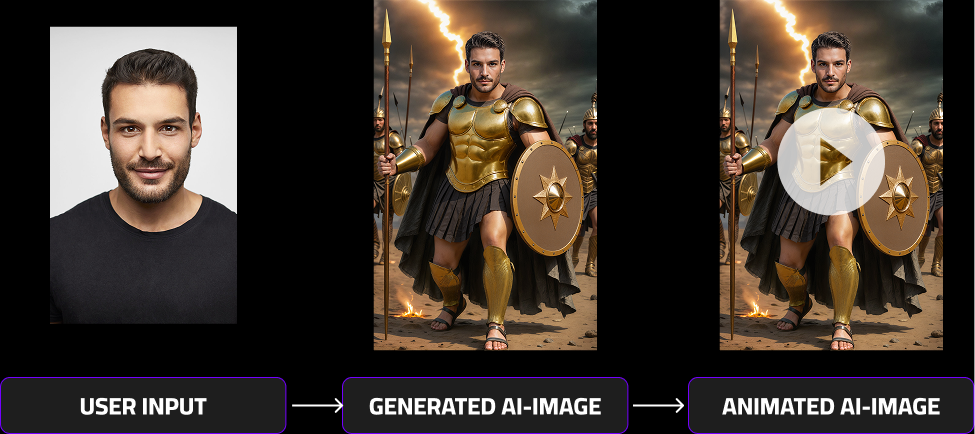
- Generate an AI Image
Start by creating an image using your preferred AI model, such as MultiSwap or FaceSwap, through the respective image generation API endpoint. - Add a Prompt and Send to the Video Endpoint
Once you receive your generated image, use it together with a custom prompt describing the desired motion or animation.
(For guidance on crafting effective prompts, see the Self-Prompting section.) - Receive the Animated Result
After approximately 2–3 minutes, the system will return your animated AI image — bringing your creation to life with smooth, AI-driven motion.
This workflow ensures you can easily transform any static image into an engaging and shareable video experience.
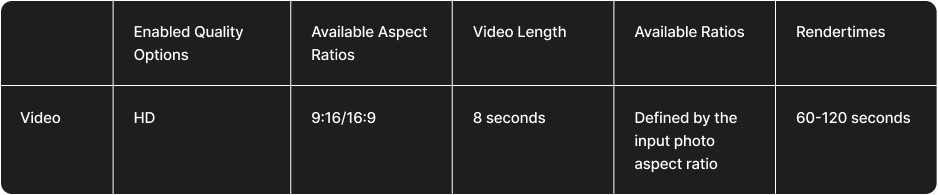
Video rendertimes comparison
Below, you’ll find detailed information about Video generation times. Keep in mind that the total render time depends on two factors:
- The AI model used to generate the input image (e.g., FaceSwap v4 or v5).
- The video generation process, which adds motion and animation to the image.
To calculate the total render time, simply combine both values. For example:
- FaceSwap v5 model render time: approximately 20–30 seconds
- Video generation time: approximately 120 seconds (2 minutes)
Total average render time:
➡️ 140–150 seconds (≈2–2.5 minutes)
Actual render times may vary slightly depending on server load, complexity of the animation, and the selected output quality.
For a visual comparison of results in both Realistic and Stylized modes, please refer to the section above.
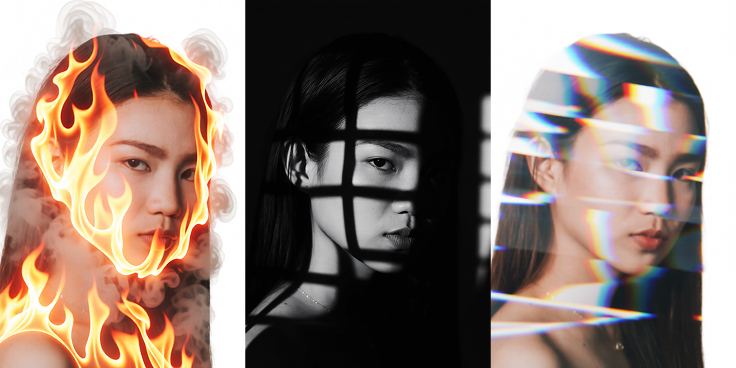
What are good input images?
The quality and composition of your input image have a major impact on the final video result. To achieve the best possible outcome, make sure your images follow the recommendations below.
✅ DO
- Use clean, high-resolution images with clear details.
- Ensure the subject is well separated from the background — strong depth and contrast help the AI interpret movement correctly.
- Keep neutral, relaxed poses — avoid extreme angles or overlapping limbs.
- Use natural, even lighting with soft shadows.
- Center the subject and avoid cropping key features such as the head, arms, or hands.
❌ DON’T
- Don’t use images with AI artifacts (extra fingers, distorted faces, or blurred textures).
- Avoid flat or overly busy backgrounds, as they confuse depth perception.
- Don’t use photos where the face or body is partially covered by hair, hands, or props.
- Avoid complex or extreme poses such as jumping, twisting, or strong perspective distortion.
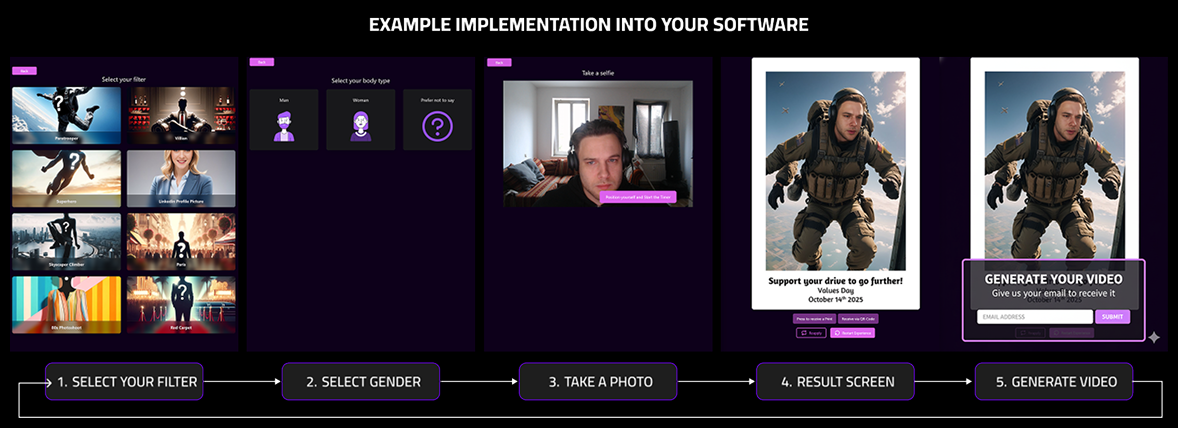
How should i create a good user journey
To integrate the Video experience seamlessly into your web app or photo booth setup, follow the recommended flow below:
- Filter or Style Selection – Let users choose their preferred filter, scene, or effect for the AI image.
- Photo Capture – Start a short countdown before taking the photo, giving users time to pose.
- Image Processing & Results – While the AI image is generated, display a loading screen. Once ready, show the result on the Result Screen.
- Generate Video Option – On the result screen, include a clear “Generate Video” button. When users select it, prompt them to enter their email address (or phone number).
- Email Notification – After the video is generated (typically within 2–3 minutes), the user receives a notification with a link to view or download their personalized AI video.
This approach allows participants to continue enjoying the event without waiting in front of the screen, while still receiving their finished video directly on their device — ensuring a smooth, engaging, and practical user experience.
At the moment, Video supports only Self-Prompting, meaning you’ll create your own text prompts to define how the generated animation should look and move.
In the near future, we’ll also introduce ready-to-use preset prompts that work well for most input images — making it even easier to achieve great results right out of the box.
Below, you’ll find proven examples, templates, and tips to help you create high-quality and dynamic video outputs using Self-Prompting.
Tools for self prompting
When working with Self-Prompting, you can choose between two integration options depending on your technical setup and desired level of control.
Direct API Integration
- Connect directly to our Self-Prompting API endpoints to build a fully custom solution.
- This option gives you complete flexibility, but requires managing your own database, storing filters, and maintaining your infrastructure.
Using Our Filter Creator (Recommended)
- For most users, we recommend starting with the Filter Creator.
- This tool provides all the necessary features to create, manage, and deploy your own MultiSwap filters without needing any additional backend setup.
- Once your filters are ready, you can instantly use them through our API, making this the fastest and easiest way to get started with Self-Prompting.
Below, you’ll find a link to the Filter Creator Guide, where you can learn how to create your first custom filters and start using them right away.
How Do I Get Started with Self-Prompting for MultiSwap?
How to Self-Prompt for Video
At the moment, Video supports only Self-Prompting, meaning you create your own text prompts to define how the generated animation should look and move.
In the near future, we’ll also introduce ready-to-use preset prompts that work well for most input images, making it even easier to achieve great results right out of the box.
Below you’ll find proven examples, templates, and tips to help you create high-quality and dynamic video outputs using Self-Prompting.
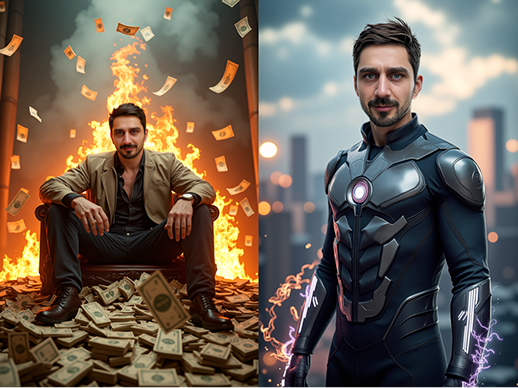
Same Prompt – Different Results
The quality and composition of your input image have a major impact on the final video.
A well-structured prompt combined with a clear, high-quality image produces much better results.
Good Example:
person looking at the camera, money falling, flames motion, movement, dynamic, camera zooms out
Bad Example:
person looking at the camera, rain and thunders, motion, movement, dynamic, camera zooms out
Proven Prompt Templates
(Text in brackets [ ] is optional or can be replaced with similar terms.)
For Solo Subjects
- person looking at the camera, motion, movement, dynamic, [camera orbits left/right]
- person [smiling], motion, movement, dynamic, [camera zooms out]
- a person moving in slow motion, movement, dynamic, [camera zooms in]
For Groups
- people standing, motion, movement, dynamic, [camera orbits right]
- people [smiling], motion, movement, dynamic, [camera zooms out]
Keyword Suggestions
- Emotions: smiling, focused, angry
- Camera Movements: camera zooms in / zooms out / orbits left / orbits right / pans left / pans right
- Motion: movement, steady, slow motion, fast motion, static
Examples of Effective Camera Movements
Prompting Do’s
- Use high-resolution, well-lit images
- Keep the subject centered and in focus
- Include action keywords like “motion”, “movement”, or “dynamic”
- Stick to one camera movement per prompt (e.g., camera zooms in)
- Optionally, add emotions such as smiling, focused, or angry
-
Match the prompt action to the input image
-
Example: a person walking [in slow motion], movement, dynamic, [camera zooms out]
What to Avoid
- Vague instructions like “make it move”
- Describing multiple people separately (use “people” instead)
- Combining several camera movements in one prompt
- Adding unrealistic elements not present in the image
Final Tips
- Start with a base prompt template and refine it step by step.
- If a result fails, simplify the description or reduce the number of actions.
- Experimentation is key — small wording changes can make a big difference in the animation outcome.