Faceswap: IMG2Filter
Image-to-Filter allows you to transform any image — whether it’s created using tools like ChatGPT, our AI image generators, or even photos provided by your clients — into a fully usable AI filter for your next event. It is ideal for business clients!
In this guide, you’ll learn:
- Transformation Logics: Img2Filter
- When to Use V5 vs V6
- Prompting for Img2Filter
- How to choose good Base Images
- How to achieve consistent results
1. Transformation Logics: Img2FIlter (via Inpainting, using Faceswap Models)
Img2Filter transforms selected regions of an image while preserving the unmasked areas. It uses:
- an input image,
- a mask to define the area of change,
- and the user’s face image to personalize the transformation.
Mask Input
Masks define the area of change in the input image.
Three main types of mask annotations (check the table below to get a full overview):
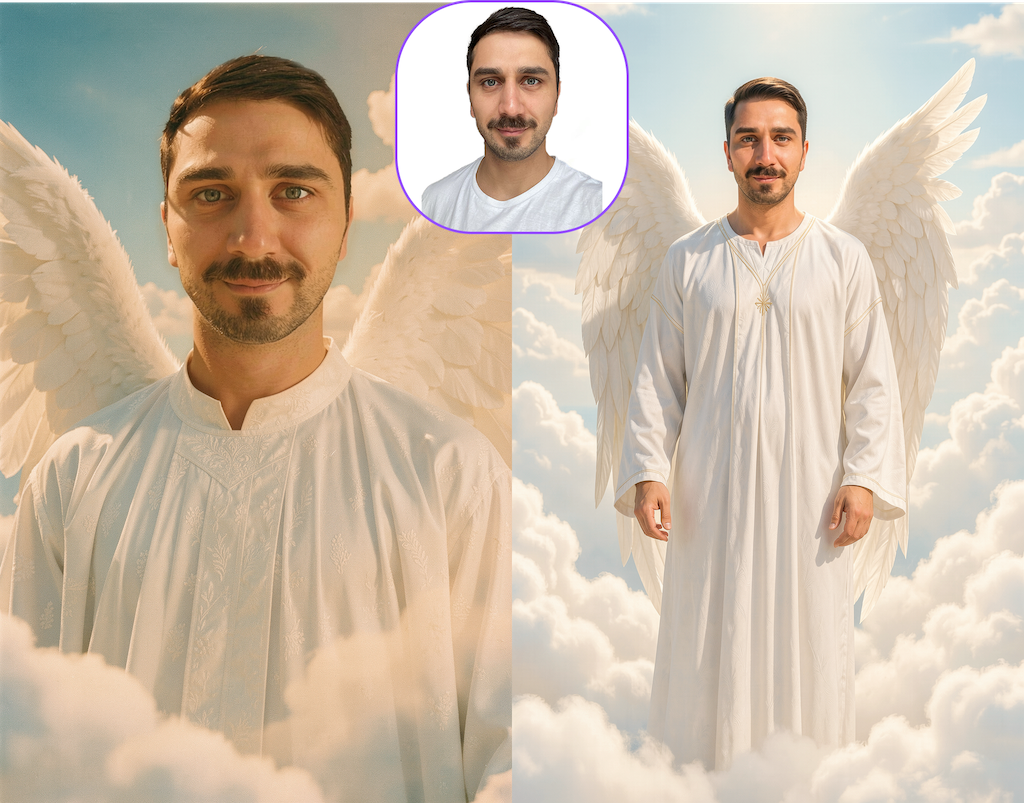
- Full-body: masks drawn over full person (face, full body, any visible skin area, clothes & even shoes)
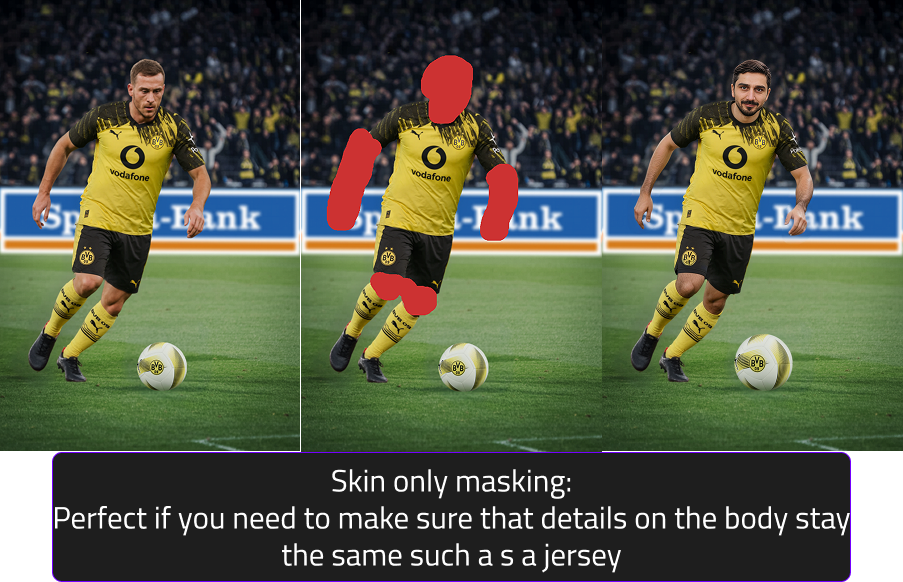
- Head & Skin-only : masks drawn only over head & visible skin areas (face, arms, etc.)
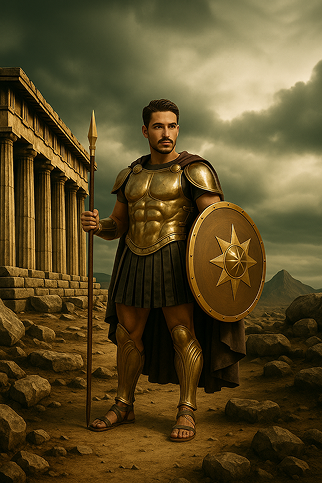
- Head only: masks drawn only over visible headareas (Head
Tips for masking
- Masks should be rough, general shapes
- Avoid tracing the subject exactly
- Keep it loose and soft-edged so filters can adapt to different body types and poses
- The goal is to define a general region, not a precise cutout
| Category | Example 1: Fully Body Mask | Example 2: only mask Skin & Head | Example 3: only mask Head |
|---|---|---|---|
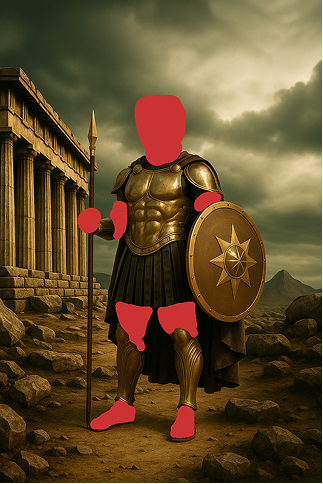
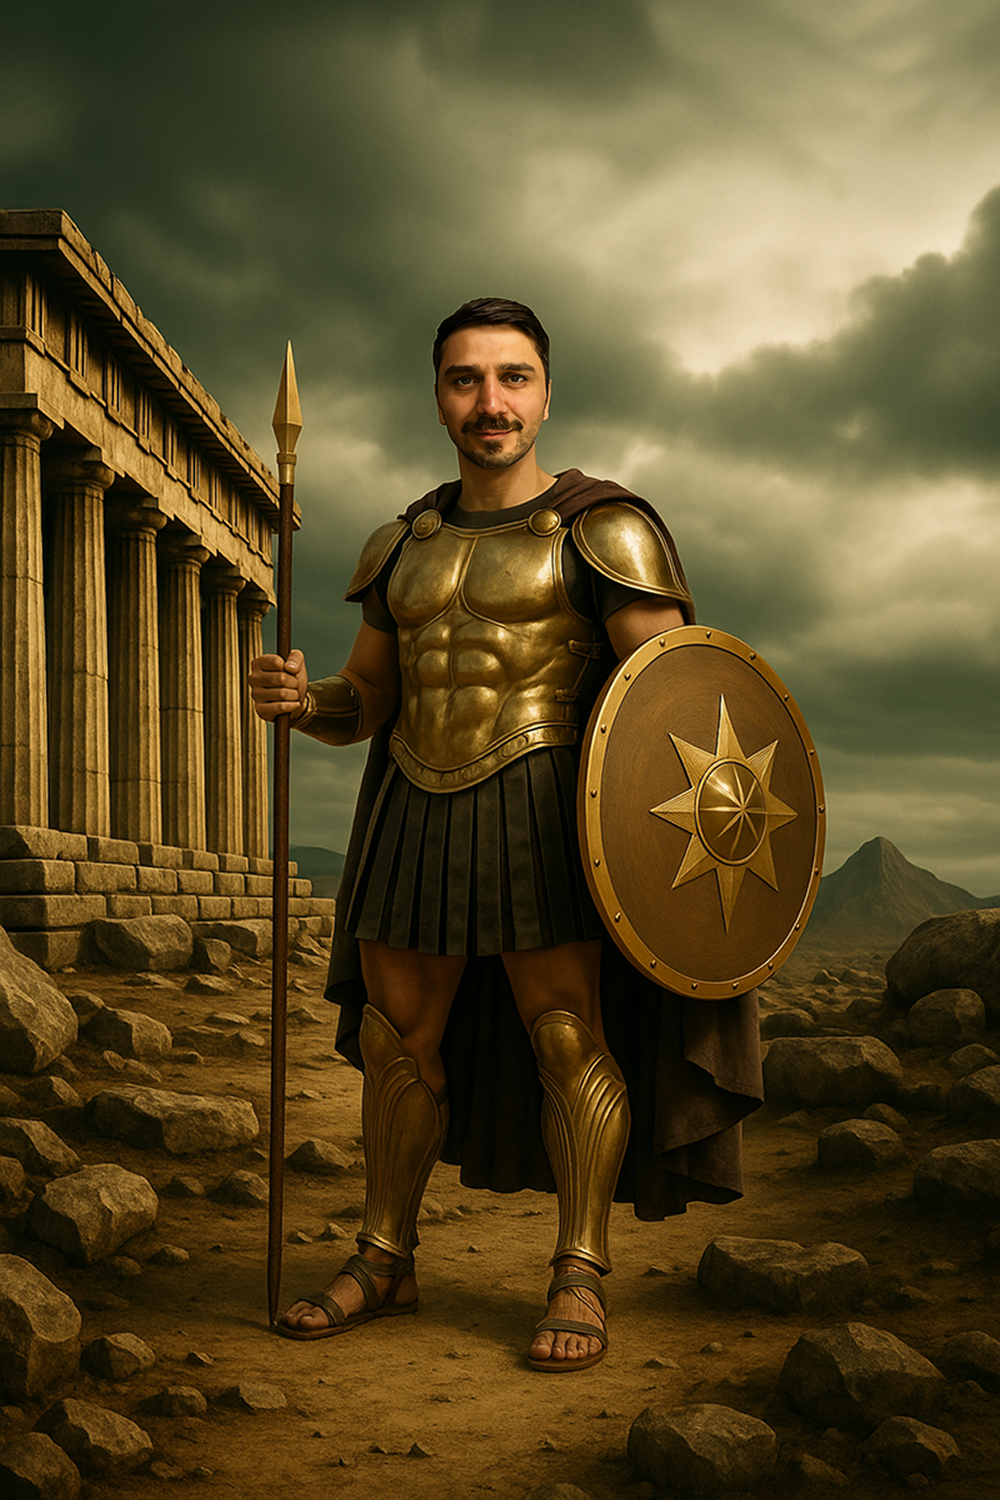
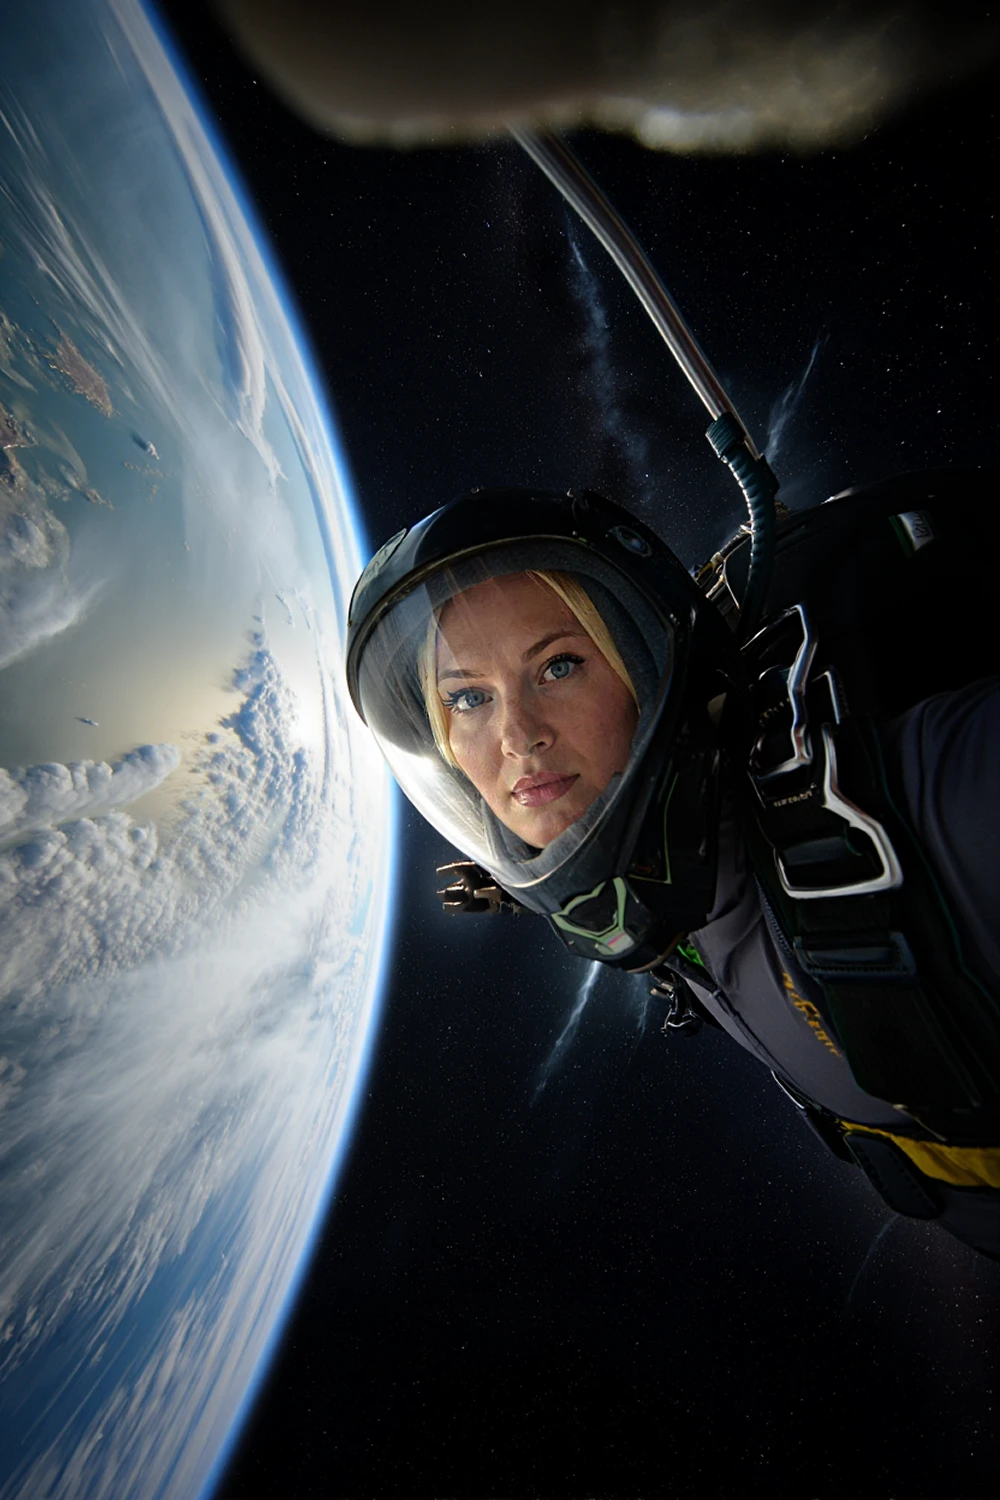
| Masking Reasoning | Full body mask since no necessary details on the body need to stay identical (e.g., no jersey or fixed outfit elements). | The body fits well in the scenery and appears unisex, therefore no full body mask required (=head + visible skin areas) | The armor must stay identical, therefore only visible skin areas are masked. If this filter should support females/children, additional base images are required. |
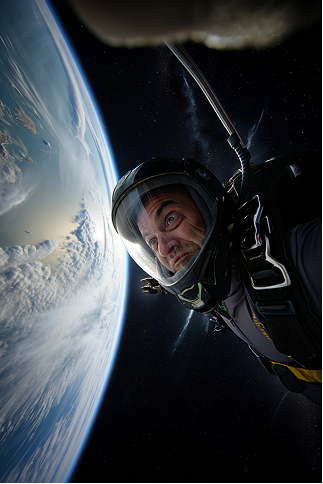
| Prompt V5 | photo of confident person in action movie style, wearing a dirty grey tank top and jungle attire, angry expression, looking at the camera, high quality | photo of a confident person, confident expression, looking at the camera, high quality | photo of a confident person wearing a astronaut helmet, focused expression, looking at the camera, high quality, 16k, |
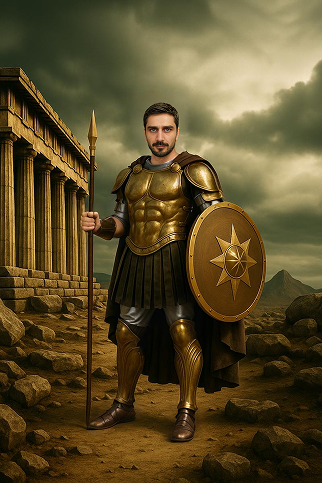
| Prompt V6 | replace the exact same person, adapt bodytype to person | replace the exact same person | replace the face |
| Benefit | All Users have different clothes and slightly different poses. | The armor stays exactly the same | Due to the perspective no other |
| Input image | 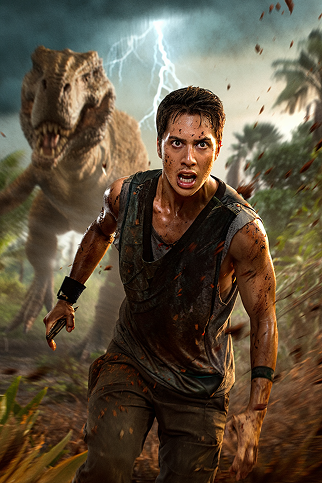 |
 |
 |
| Example for Mask | 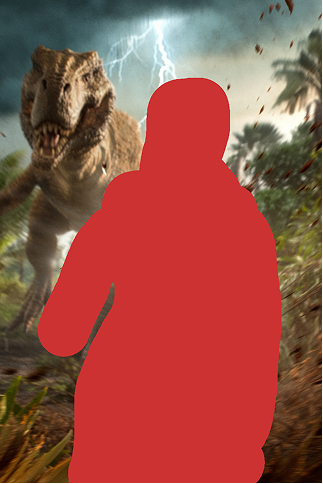 |
 |
 |
| Result V5 |  |
 |
 |
| Result V6 | 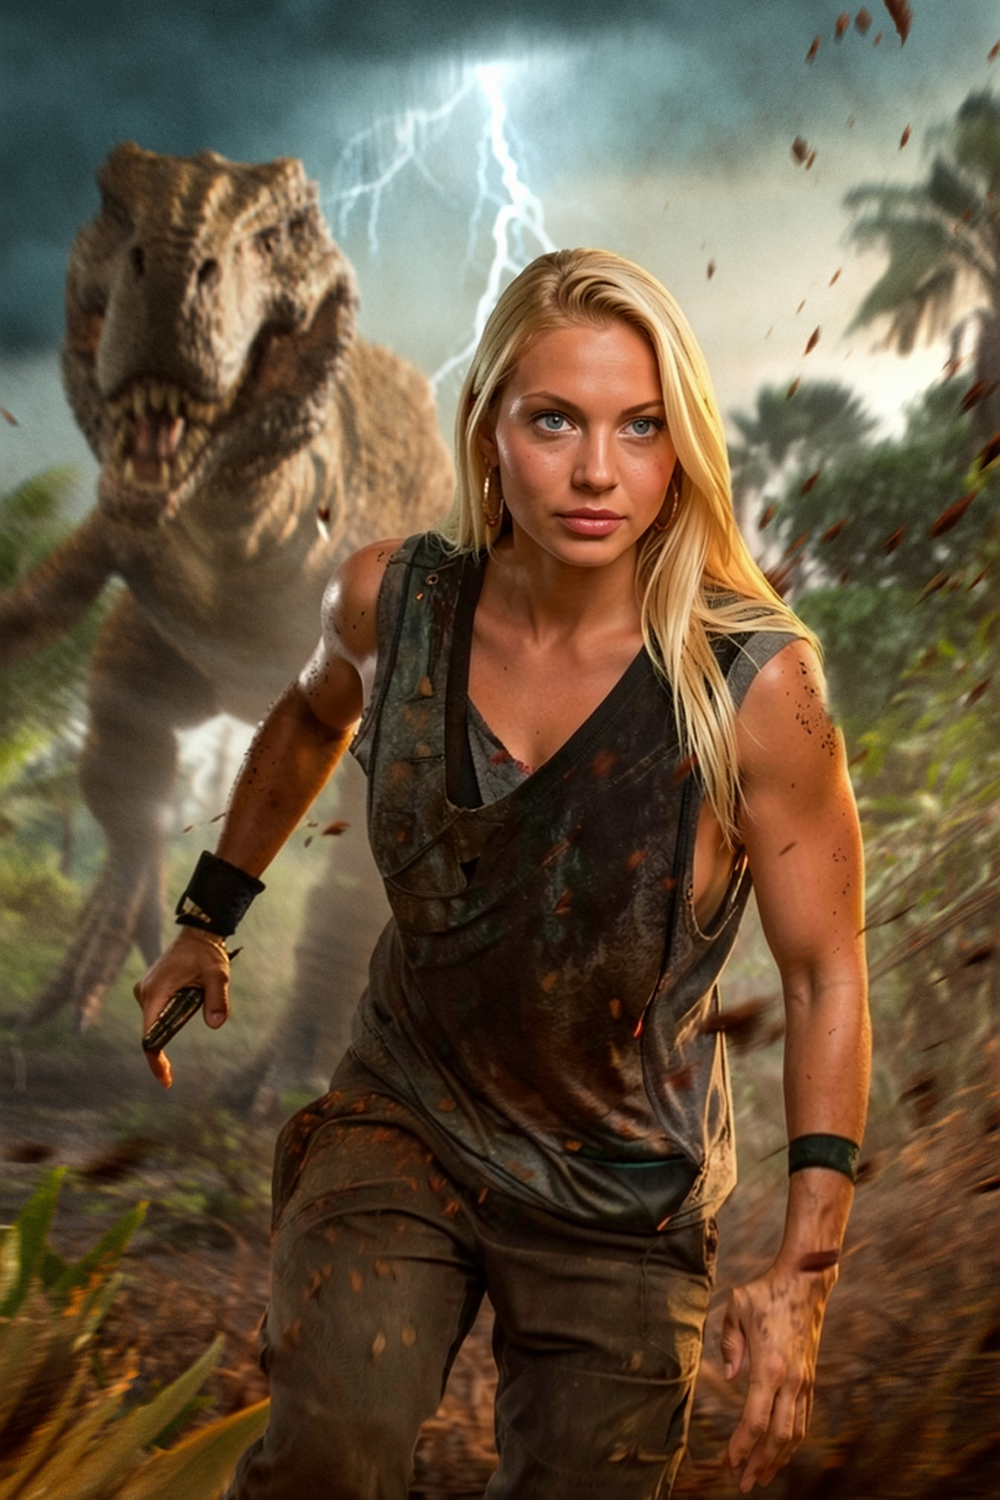 |
 |
 |
When to Use V5 vs V6
Both models use the same masking and workflow — but they perform best in different scenarios.
Faceswap V6 (Flagship Model)
V6 is our highest-quality model and delivers the most realistic and consistent results when the conditions are right.
Use V6 when:
- The person is clearly visible
- The face occupies a good portion of the image
- The pose is clean and easy to read
- You want the highest realism and detail
- You work with cinematic, fantasy, or stylized concepts
- The composition focuses on one main person
V6 performs best when the subject is medium-to-close in frame and visually clear.
Current limitations
V6 may not perform as well when:
- The person is very small in the image
- Faces have low pixel detail
- There are dynamic sports or action poses
- Multiple people appear in one image
- Body or skin areas are very small or unclear
We are continuously improving these scenarios.
Faceswap V5 (Reliable for Complex Scenes)
V5 is slightly less detailed than V6 but more robust in challenging situations.
Use V5 when:
- The person is small in the image
- You work with sports or action shots
- Group or team images are used
- Poses are dynamic or complex
- Face visibility is limited
- The scene is crowded or busy
V5 handles these edge cases more consistently.
Quick rule of thumb
Clear, visible subject → Use V6
Small, dynamic, or group scenes → Use V5
Prompting for V5
V5 works best with flexible, descriptive prompts that match the base image.
Do
- Be specific but brief
- Focus on visual details
- Match the prompt to the base image
- Use keywords (lighting, style, mood)
- Use negative prompts to block unwanted elements
Example
photo of confident person in action movie style wearing jungle outfit, angry expression, looking at the camera, cinematic lighting, high quality
Negative prompt example
helmet, hat, sunglasses, weapon
Avoid
-
Indirect phrasing
-
❌ astronaut without helmet
- ✅ astronaut + negative: helmet
- Too many ideas in one prompt
- Changing camera angle drastically from base image
Always align your prompt with what is already visible in the base image.
Prompting for Img2Filter with V6
V6 prompting works differently from V5.
The base image already defines the scene, pose, lighting, and composition — your prompt should only describe what gets replaced.
Keep prompts short and direct.
Core principle
Tell the model:
Who is replaced and optionally what they should wear.
The pose and perspective always come from the base image.
Recommended prompt structure
Use simple replacement instructions:
- replace the exact same person
- replace the exact same person, wearing [outfit]
- replace the face
- replace the exact same person, adapt bodytype to person
Outfit descriptions are allowed, but keep them concise.
Prompting Do’s
Keep prompts short and functional
- Focus only on the replacement
- Add outfit only if needed
- Let the base image define everything else
Match prompt to mask type
Full body mask
- replace the exact same person, adapt bodytype to person
- Optional: add outfit if clothing should change
Head + skin mask
- replace the exact same person
- Optional: add small outfit adjustments
Head only
- replace the face
- Keeps outfit/armor identical
Good concise examples
- replace the exact same person wearing a luxury suit
- replace the exact same person, adapt bodytype to person, wearing football jersey
- replace the face
Prompting Don’ts
- Don’t describe the pose
- Don’t describe the environment
- Don’t rewrite the whole scene
- Don’t use long cinematic prompts
- Don’t change camera angle or perspective
The base image already controls these elements.
How to choose good Base Images
The subject’s face must be fully visible. Avoid images where the face is covered or partially blocked by hands, masks, visors, or any other objects.

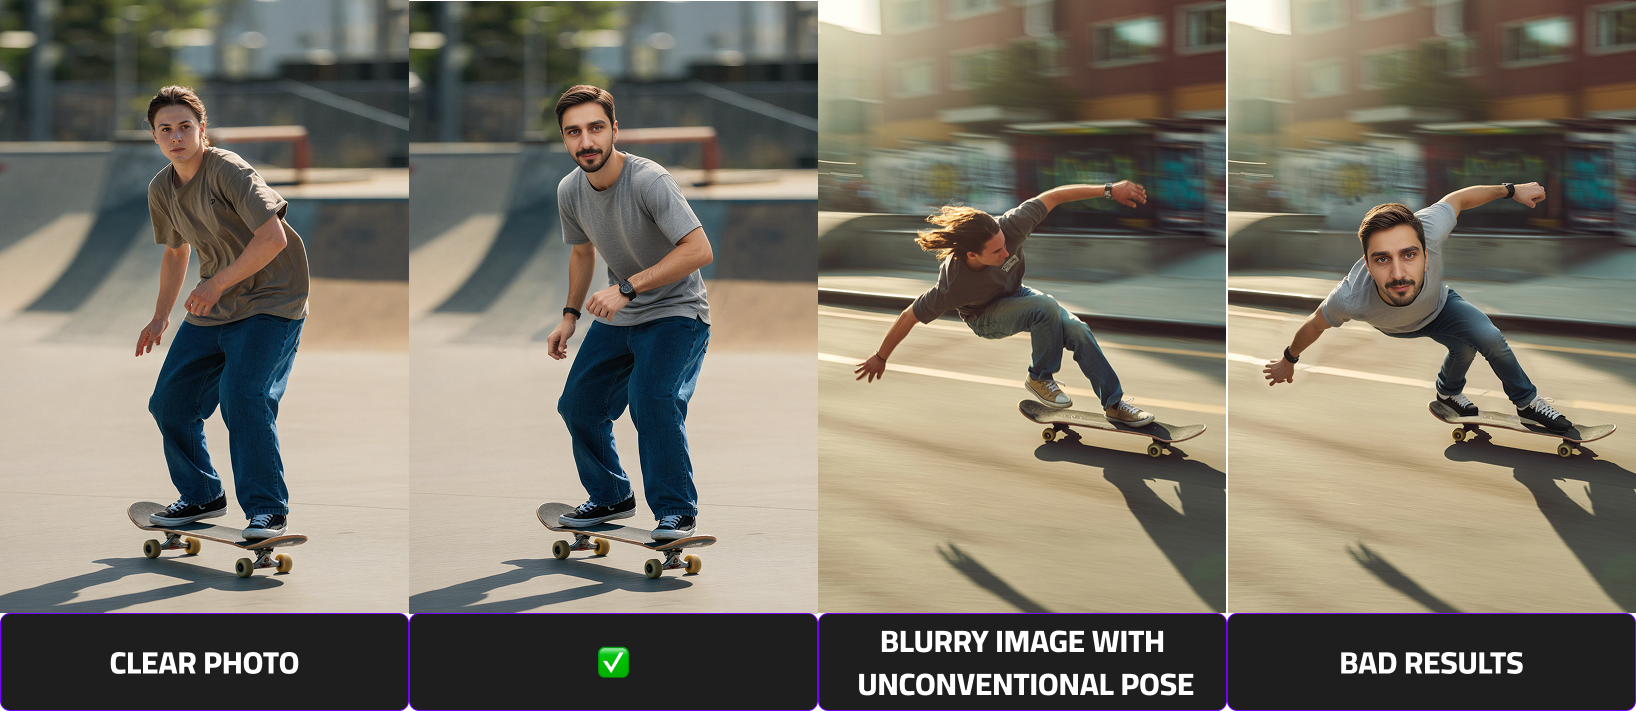
Provide Sharp Images With Simple, Readable Poses
Choose images that are in focus and easy to interpret. Blurry photos or complex poses can significantly reduce output quality.
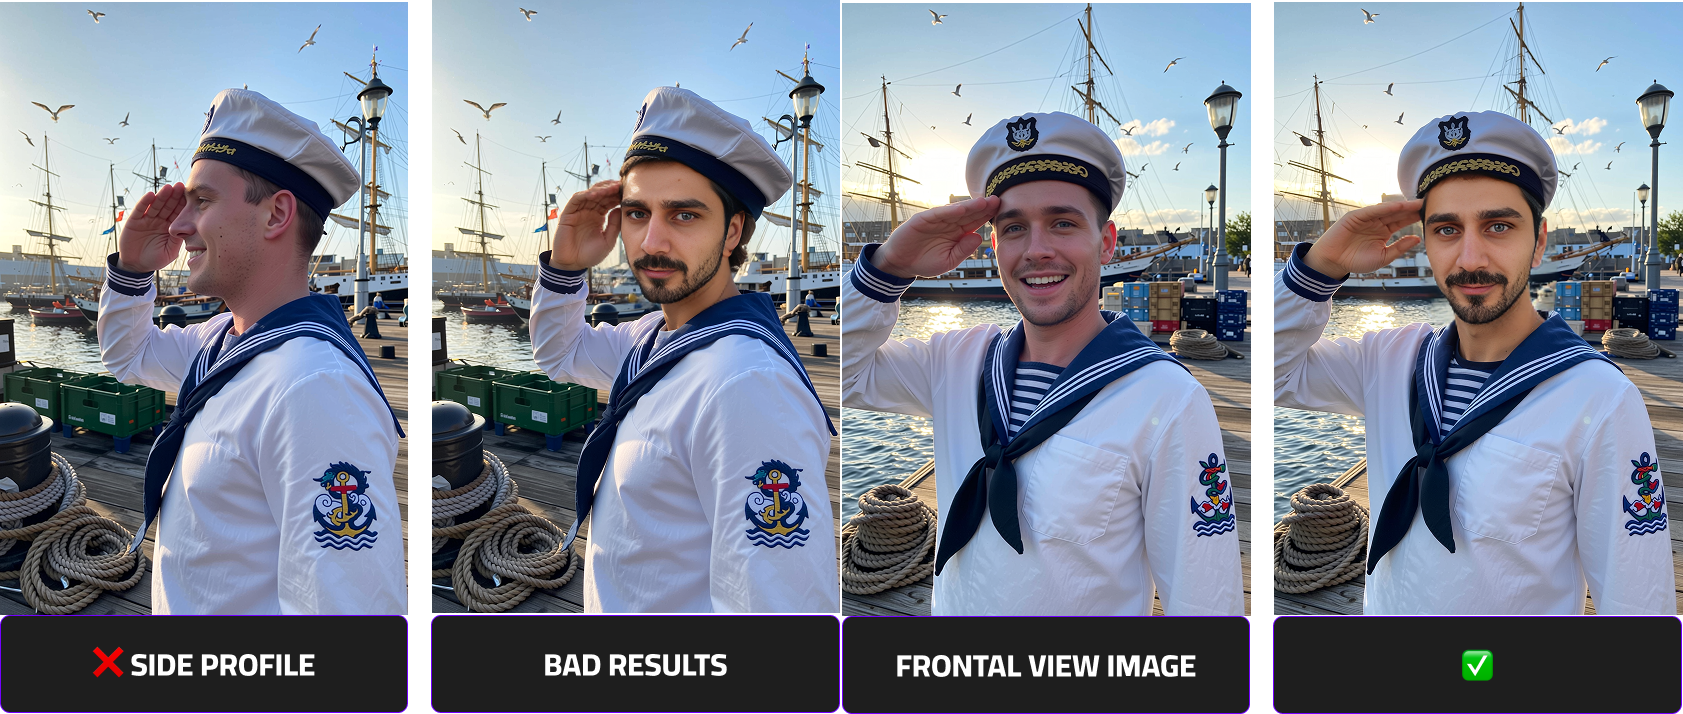
Prefer Front-Facing Photos
The face should be facing forward with minimal head rotation and minimal shadows. Side profiles or heavily angled shots are not recommended as they result in deformed representations of the users.
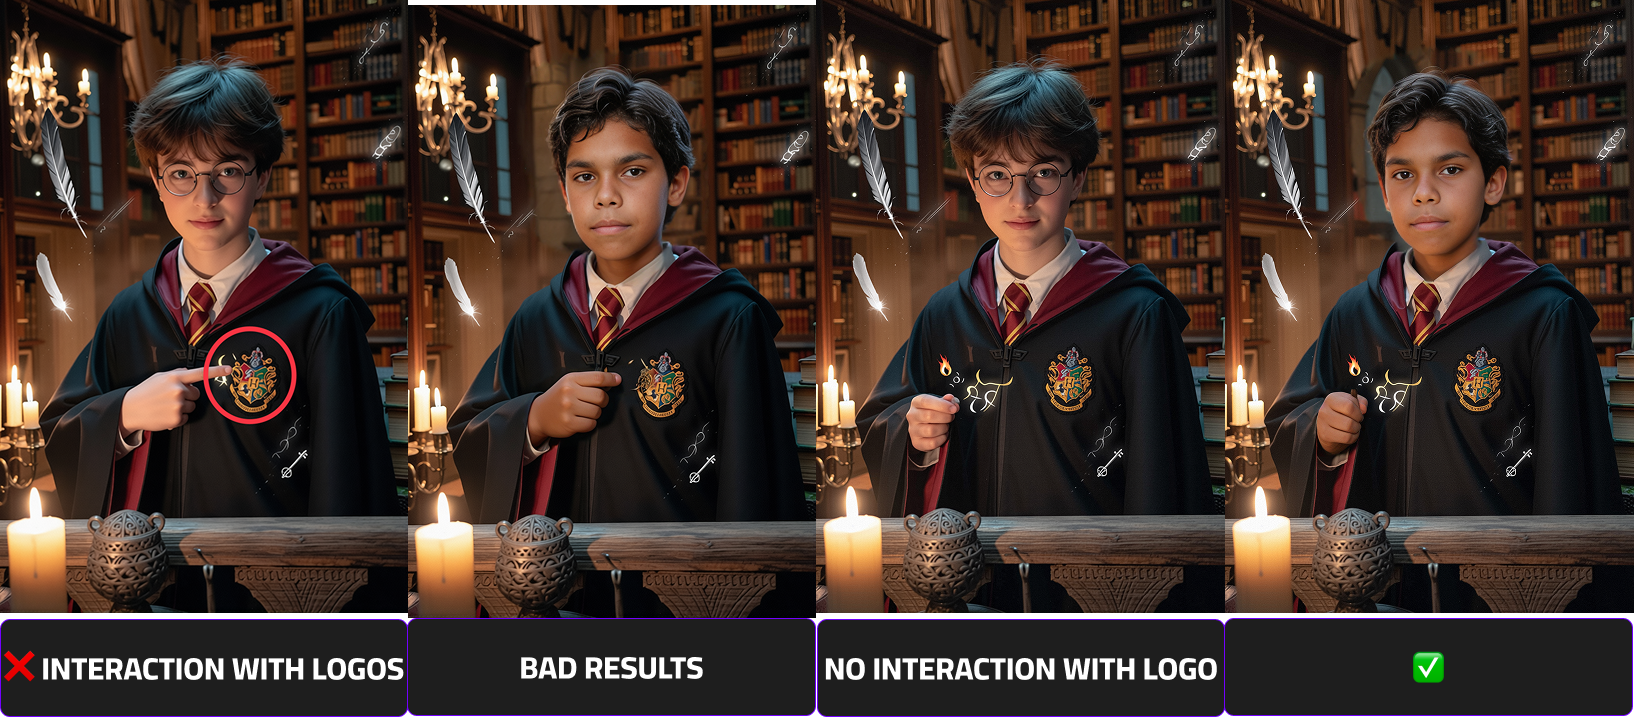
Avoid Interaction With Brand Logos
Images where the subject touches or overlaps with brand logos may introduce unwanted distortions during processing. Ensure there is no physical interaction with any branded elements.
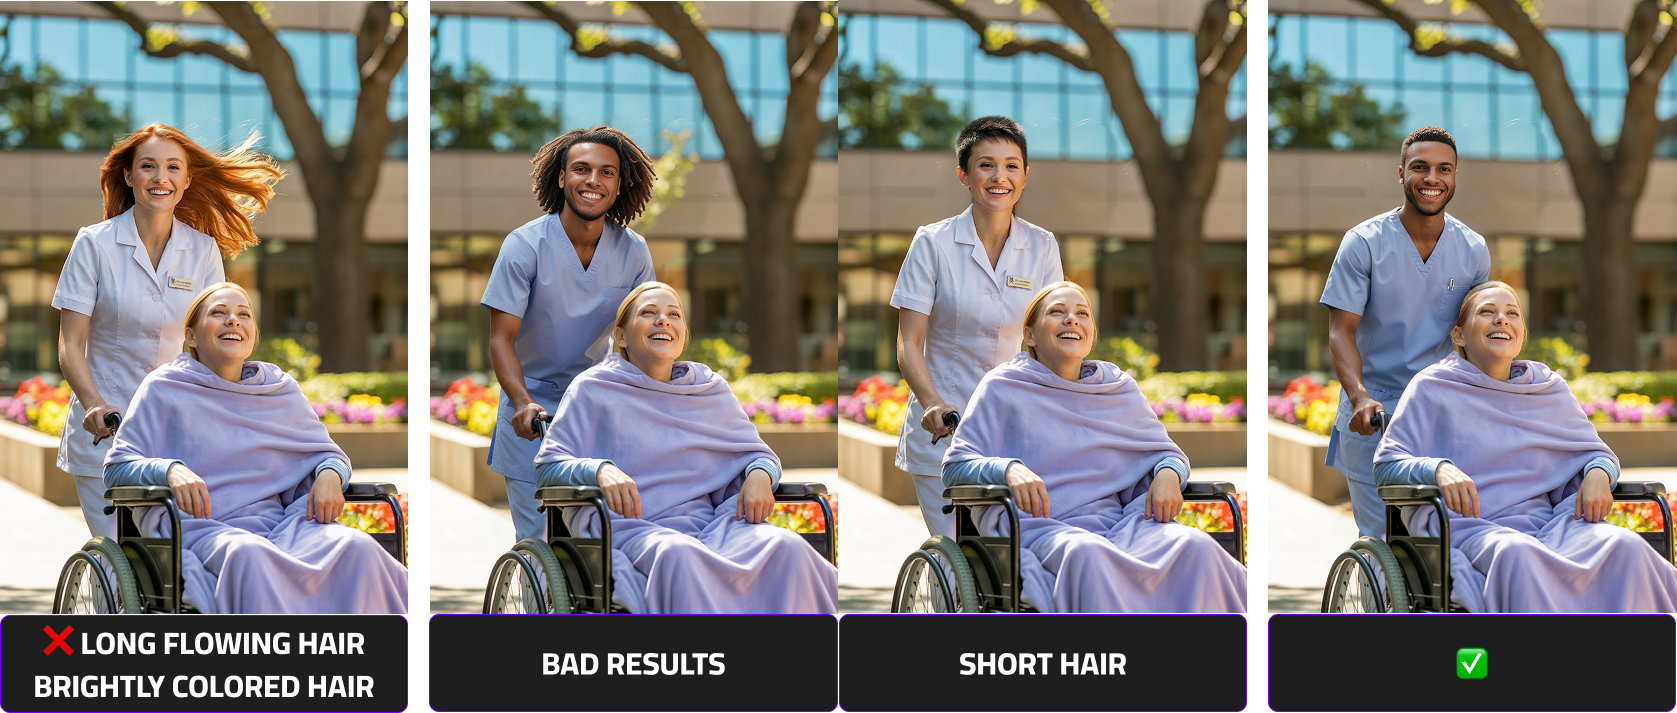
Use Subjects With Neutral, Non-Flowing Hair
For best compatibility across different face swaps, avoid subjects with brightly colored, dynamic, or flowing hair that may complicate the inpainting process.
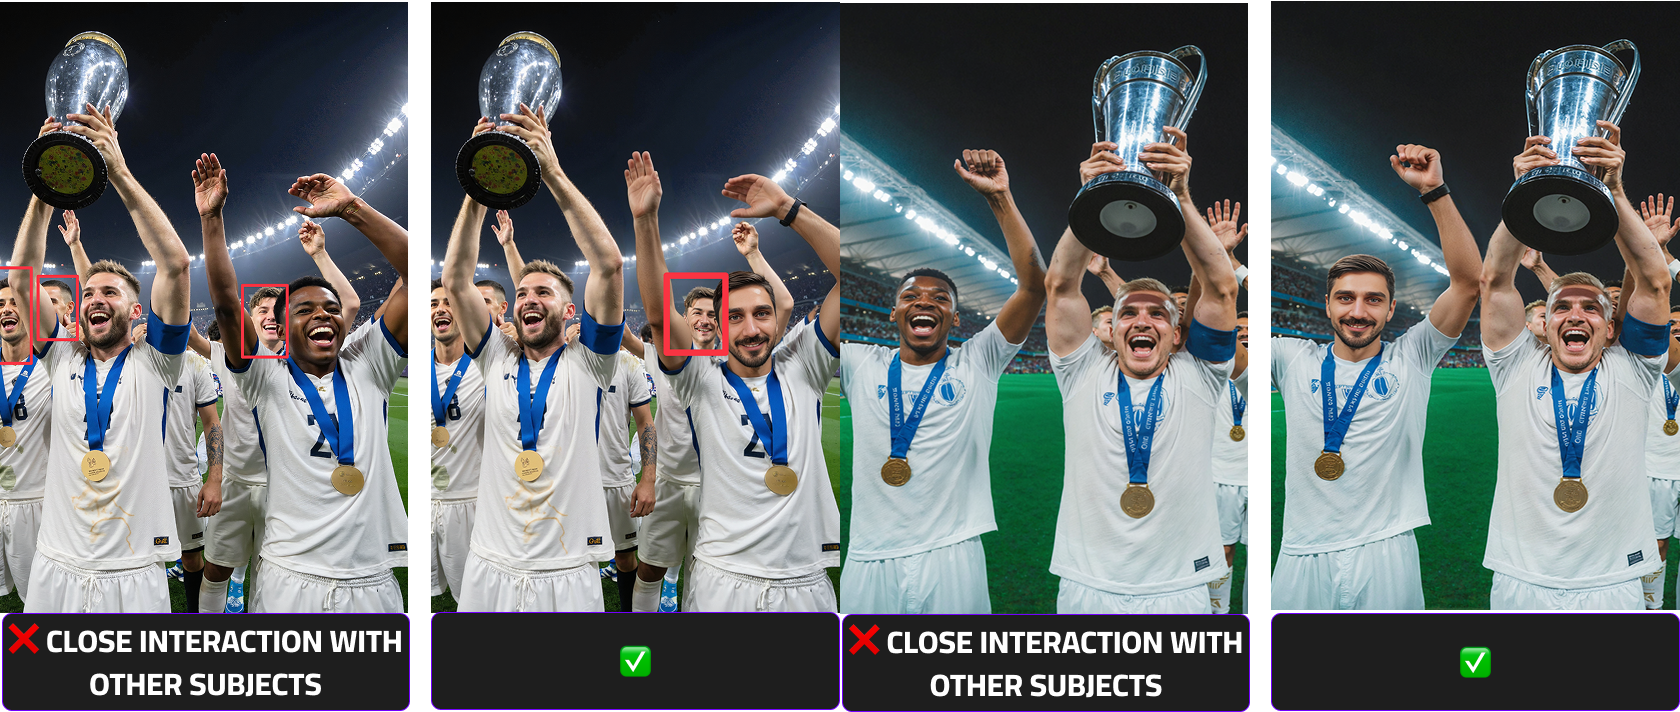
Limit Close Contact With Other People
Images where faces, arms, or bodies are very close together — especially around the areas to be swapped — can lead to unintended facial distortions. Use photos with clear separation between individuals.
Note
When working with low-quality or unsuitable base images, it may be necessary to make small adjustments such as removing distracting or unwanted elements to achieve acceptable results.
In some cases, however, it may be significantly more efficient to recreate the entire image in a more appropriate and face-swap-friendly manner
How to achieve the highest and consistent results
Beside a clear prompt and the input photo, esp. the output scene has a big impact on the output quality.
The most important factor for high-quality deepfake results is how many pixels the face occupies in the image.
- Larger face area → More facial detail captured
- More detail → Better identity reconstruction
- Better reconstruction → Higher realism
Close-up portraits consistently produce the strongest results because the model can focus its precision on facial features instead of distributing resources across a large, complex scene.
| Scenario | Image Type | Face Pixel Density | Expected Quality | Recommendation |
|---|---|---|---|---|
| ✅ Best Case | Close-up / Portrait | High (large visible face area) | Highest quality results | Strongly recommended |
| ⚠️ Medium | Half body | Moderate | Good quality results | Acceptable |
| ❌ Worst Case | Full body (small head area) | Low (small visible face area) | Reduced quality / less detail | Avoid if possible |
A Scene complexity directly influences recognizability and rendering accuracy.There is always a balance between identity precision and cinematic storytelling.