Prompting Guide Img2Filter Faceswap V6
In this chapter you learn, how to:
- Prompting for Image2Filter (V6)
- Example for Prompts and Masks
- How to draw Masks
- Example for Prompts and Masks
- What kind of Output Images can be created?
Prompting for Image2Filter (V6)
V6 prompting is simple and replacement-based. Please use natural language.
Tell the model who is replaced and optionally what they should wear.
The base image already defines the scene, pose, lighting, and composition, so the prompt should only describe what gets replaced.
- The Image/Scene is the main driver for the filter.
- Changing the image has a bigger impact than trying to change the filter via the prompt.
- Outfit descriptions are possible. Keep them short and direct.
Example prompt:
Note: Match Prompt to Mask Type - other than previous Models has the Faceswap V6 Model predefined Mask Modes. Use for the text prompt, simple replacement instructions:
replace the exact same person
replace the exact same person, wearing [outfit]
replace the face
replace the exact same person, adapt bodytype to person
Prompting Don’ts
- Don’t describe the pose
- Don’t describe the environment
- Don’t rewrite the whole scene
- Don’t use long cinematic prompts
- Don’t change camera angle or perspective
How to draw Masks
- Masks should be precise, don´t make the mask a lot bigger than it has to be
- trace the subject
- The goal is to define a precise region, not a rough area
Tip: Match prompt to mask type
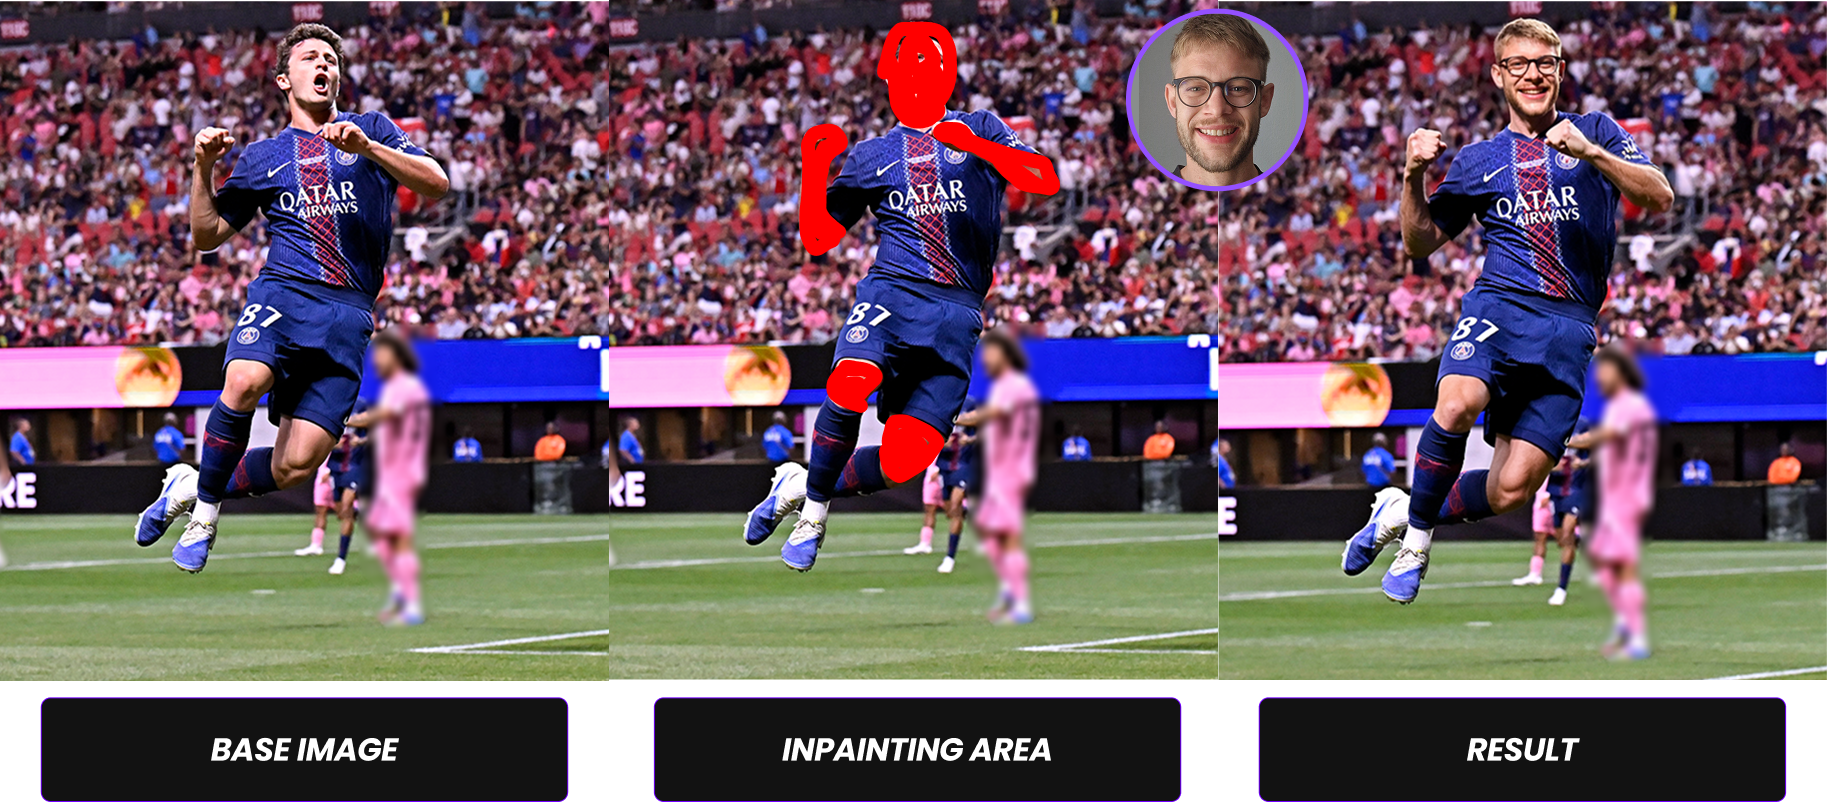
Example for Prompts and Masks
| Type of Masking | Mode | Base Prompt | Example incl. Optional Prompt Part |
|---|---|---|---|
| Full body mask | Full Body | switch the person, adapt bodytype to person | switch the person, adapt bodytype to person wearing outfit |
| Head + skin mask | Skin Only | switch the person | switch the person, comic style |
| Head only | Skin Only | switch the face | switch the face, comic style |
What kind of Output Images can be created?
Beside a clear prompt and the input photo, esp. the output scene has a big impact on the output quality.
The most important factor for high-quality deepfake results is how many pixels the face occupies in the image.
- Larger face area → More facial detail captured
- More detail → Better identity reconstruction
- Better reconstruction → Higher realism
Close-up portraits consistently produce the strongest results because the model can focus its precision on facial features instead of distributing resources across a large, complex scene.
| Type of Shot (Output/AI-Image) | Face Pixel Density | Expected Quality | Recommendation |
|---|---|---|---|
| Close-up / Portrait | High (large visible face area) | Highest quality results | Strongly recommended |
| Half body | Moderate | Good quality results | Acceptable |
| Full body (small head area) | Low (small visible face area) | Reduced quality / less detail | Avoid if possible |
A Scene complexity directly influences recognizability and rendering accuracy.There is always a balance between identity precision and cinematic storytelling.